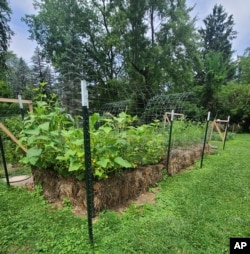
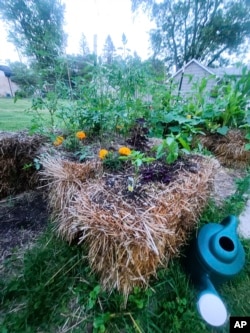
You do not need good soil – or even soil at all – to grow plants. Straw bales can work, too.
Straw is the dry stems of wheat and other grain plants. Straw bales are made of straw that has been tightly pressed together. They can be used to grow vegetables in a cost-effective and easy-to-care-for way.
If you are going to use straw bales for your gardening needs, it is important to know what to look for. Avoid bales made of hay. Hay bales contain seeds and are meant for horses.
Straw is for gardening. Most of its seeds have been harvested. There should not be many (or any) remaining seeds in the bale.
Straw is less likely than hay to have been treated with chemicals that could slow your plants’ growth or even prevent it. To be sure, it is a good idea to ask the seller if their bales have been treated with chemicals.
Preparation
It will take about two weeks to condition your straw bales. The process turns it into a fertile bed for plants.
Choose an area that offers the correct amount of sunlight for the plants you will be growing. You can place the bale on any flat surface. But keep in mind that after the bale is wet, it will be very heavy and difficult to move.
Set the bale with its cut end facing up, then begin the conditioning process.
During the first three days, apply water slowly and evenly until it begins to run out the bottom of the bale. You can use equipment like a hose set over the top to do this.
On days four through 10, spread 78 milliliters of herbicide-free grass fertilizer that contains at least 20 percent nitrogen. Spread it across the top of the bale. If you do not want to use chemicals, you can also spread a 50/50 mix of ground bone and blood.
Water the bale to spread the fertilizer. But do not overwater. That could wash out the nutrients.
Continue to water the bale daily.
The nitrogen will break the straw down and make the bale into a nutrient-rich environment for plants. As this happens, the center of the bale will heat up and then begin to cool. It will be safe to plant seeds or young plants when the temperature drops below 38 degrees Celsius.
Some mushroom growth at the beginning of the process is normal. They will die down on their own. But do not eat them.
Planting and growing
Finally, it is time for planting. Make holes or cut open the top of the bale and plant your seedlings. Fill each hole with soil. If you are planting seeds, make holes that follow the depth suggestion in the directions. Drop larger seeds in, and then fill each hole with soil.
If you are planting smaller seeds, spread some soil over the bale’s surface, plant the seeds, and then spread more soil to meet the suggested depth.
Continue to water your seeds or plants daily to make sure the center of the bale and the area around each plant are kept moist. Depending on the weather, additional watering may be necessary. Do not let the bale dry out.
Add fertilizer and amendments throughout the growing season as you would with normal plants.
Many flowers and vegetables grow well in straw bales. But vegetables that have heavy tops and shallow roots should be avoided.
I’m Gena Bennett.
Jessica Damiano reported this story for The Associated Press. Gregory Stachel adapted it for VOA Learning English.
______________________________________________
Words in This Story
apply – v. to put or spread (something) on a surface or a part of the body
herbicide – n. a chemical used to destroy plants or stop plant growth
mushroom – n. a fungus that is shaped like an umbrella
moist – adj. slightly or barely wet: not completely dry
shallow – adj. having a small distance to the bottom from the surface or highest point


Forum